Authenticating Webhooks
To ensure secure communication via webhooks, Waitwhile allows for two different methods for authenticating webhooks:
- Signature Header Validation
- OAuth 2.0 JWT Bearer Token
Signature Header Validation
Waitwhile allows for validating a signature that is included in each webhook request via an X-Waitwhile-Signature header.
Waitwhile will sign the webhook events it sends to your endpoints. We do so by including a signature in each event’s X-Waitwhile-Signature header. This allows you to validate that the events were sent by Waitwhile and not by a third party.
Before you can verify signatures, you need to retrieve your endpoint’s secret from the settings. Each secret is unique to the endpoint to which it corresponds. You can have multiple webhooks that utilize the same secret as long as the corresponding endpoint is the same.
The signature is created by concatenating webhook URL and payload as a UTF-8 string, and then creating a hash-based message authentication code (HMAC) with SHA-256, encoded using Base64. See example code below:
function verifyWebhookSignature(signature, url, payload, secret) {
return signature == crypto.createHmac('sha256', secret).update(Buffer.from(url + payload, 'utf-8')).digest('base64');
}
OAuth 2.0 JWT Bearer Token
This authentication method creates a token that Waitwhile will pass to the webhook endpoint in an Authorization header, allowing to verify that the request originated from the Waitwhile server.
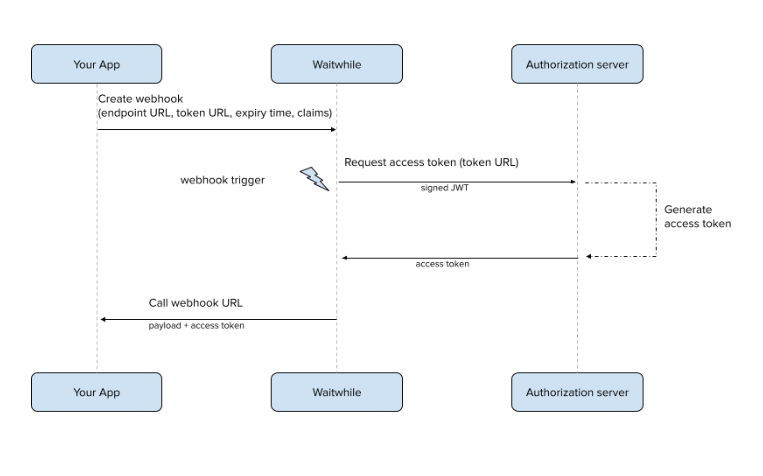
OAuth 2.0 JWT Webbook Flow Overview
- Create a webhook along with the following data required for the authentication:
- Token URL (the URL that Waitwhile calls for an access token)
- Private key (needed to sign the JWT assertion that is used to request an access token)
- Expiration time (the expiration time of the JWT assertion, in seconds)
- Claims:
-iss (identifier for the server issuing the token)
-sub (unique identifier of the user)
-aud (identifier of the recipient that the token is intended for)
-any additional claim (eg. “scope” that GCP OAuth 2.0 implementation requires)
- On a webhook trigger Waitwhile first needs to call the Token URL (your authorization server/OAuth service) to generate an access token. It creates and signs a JSON Web Token using the provided claims (plus calculates “exp” and “iat” claims) and the private key, and makes the access token request. The authorization server uses the token to generate an access token. The token gets sent back to Waitwhile.
- The access token is stored on the Waitwhile end to be reused during the duration window specified by the “expires_in” value in the authorization server response. After the access token has expired, Waitwhile requests another access token when the webhook gets triggered next time.

- The access token is included in an Authorization HTTP header Bearer value when calling the webhook URL.
Implementation
OAuth can be configured either directly in the Webhooks settings area of Waitwhile's UI, or by utilizing the Create/Update Webhooks endpoint with the API.
Example of oAuth object for request payload:
"oAuth": {
    "tokenUrl": "https://test.com/test",
    "expirationPeriod": 3600,
    "privateKey": "A <strong>very long-sized</strong> string",
    "claims": {
        "iss": "A medium-sized string",
        "sub": "A medium-sized string",
        "aud": "A medium-sized string"
    }
}
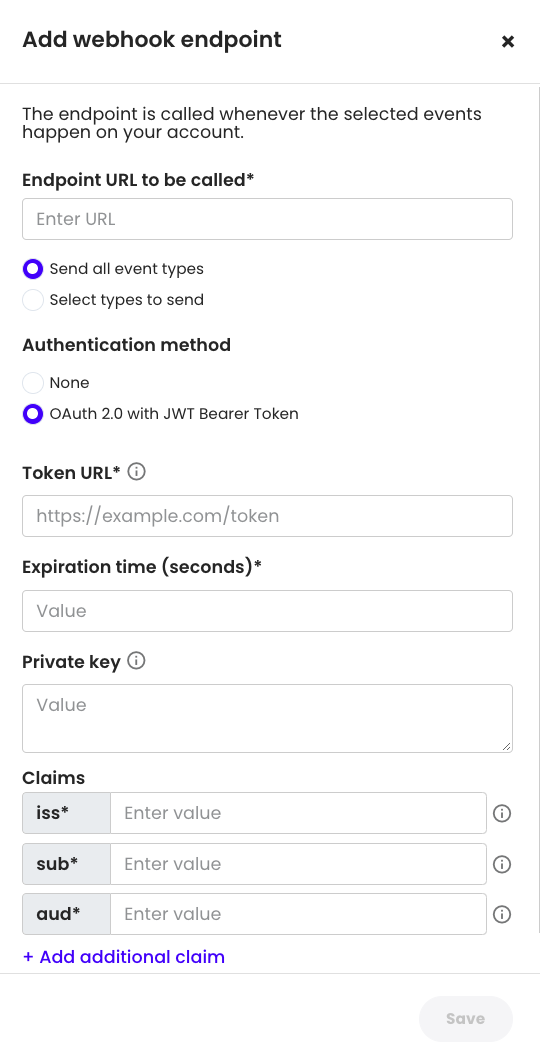
To configure within the UI:
- Go to Settings > API & Webhooks > Webhooks > Add endpoint (or Edit)
- Select "OAuth 2.0 with JWT Bearer Token" under Authentication Method
- Fill out information (outlined in #1 of the above flow overview) and Save

Updated 5 months ago
